matlab与FPGA无线通信、FPGA数字信号处理系列(2)——Vivado调用IP核设计FIR滤波器
本文共 2005 字,大约阅读时间需要 6 分钟。
本讲在Vivado调用FIR滤波器的IP核,使用 中的 matlab 滤波器参数设计 FIR 滤波器,下两讲使用 和 ,结合 FIR 滤波器搭建一个信号产生及滤波的系统,并编写 testbench 进行仿真分析,预计 、 开始编写 verilog 代码设计 FIR 滤波器,不再调用 IP 核。
本例使用 Vivado 2018.2 调用 IP 核实现 FIR 滤波器,使用中的matlab的fdatool工具箱导出的滤波器参数(FIR_BPF_99_1_5M.coe文件)。

1.新建工程
(1)Create Project -> RTL Project,一直Next直到选择器件,选择自己使用的器件; (2)新建原理图文件,Create Block Design; (3)将上一讲中从 MATLAB 中导出的FIR_BPF_99_1_5M.coe文件放在新建工程后的工程目录下;
2.添加IP核
(1) 加入FIR的IP核,在新建的原理图文件design_1中点击 1 处的加号,会弹出对话框,在2处输入 fir 即可(不区分大小写),双击 3 处的 ”FIR Complier”; (2) 原理图中出现FIR的原理图,双击该IP核;
3.配置FIR滤波器IP核
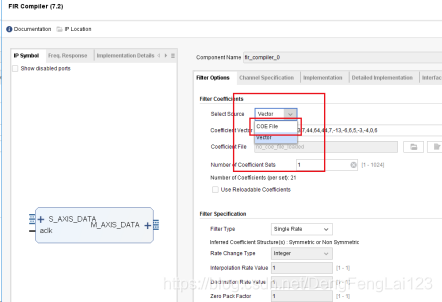
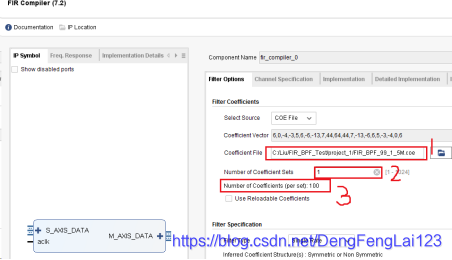
(1)在第一页Filter Options中,红色框内可以配置滤波器的系数来自 .COE 文件(COE File)或者来自向量形式(Vector),此处选择 “COE File”; (2)1处变为COE File后,点击 2 处加载/导入滤波器的系数文件,弹出文件选择框,选择 3 处的 FIR_BPF_99_1_5M.coe(中从 MATLAB 中导出的文件,新建工程后将其放在工程目录下),点击 4 处的确定,成功加载。
  加载成功后可以看到,1处显示出文件的路径;2处默认为1,表示有几路滤波通道,此处选择 1 路;3处的数据是100,无法更改,表示的是从刚刚加载的 .coe 文件中读取到 100 个滤波器系数;
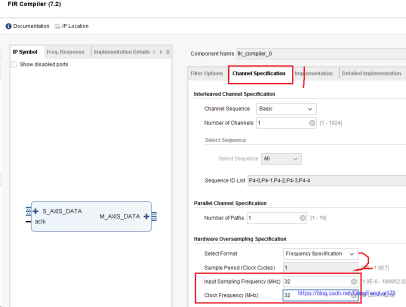
  (3)滤波器配置-2 点击 1 处配置滤波器的第 2 页,主要配置 2 处的系统时钟和数据采样时钟,在上一讲中设置 matlab 滤波器参数时是 32 MHz采样频率,所以此处选择输入采样时钟为 32 MHz,为了方便起见,此处设置系统时钟为 32 MHz(实际工作中系统时钟不是这个频率的,可以通过PLL等获得 32 MHz,此处我们只做仿真,系统时钟可以通过 testbench 任意设定);
  (4)滤波器配置-3 点击 1 处配置第 3 页;2 处设置滤波器系数的格式,有符号数signed,整数类型,位宽为 16 位(在上一讲中是将滤波器系数进行 16 位量化后导出);3处选择滤波器结构,上一将中设计的滤波器是对称结构,选择Symmetric;4处配置输入数据的格式,此处保持默认,输入有符号数,16位宽度,,如果输入的要滤波的数据不是该配置,可以点击5处的正方形,点击之后对应的方框有灰色变成白色,可以进行修改里面的参数;
  (5)其他保持默认,点击OK退出配置。
 4.例化IP核
(1)熟悉输入输出端口 FIR的IP核直接给出了AXI-Stream形式的接口(一种符合AXIS-Stream总线协议的端口,此处不需要太关注该协议,用不到),点击两个“+”可以展开里面包含的端口,可以看到,共有: a.一个时钟端口 aclk,频率为 32 MHz; b.两个输入 s_axis_ddata_tdata[15:0]:16位的待滤波的输入数据,采样频率 32 MHz,每个时钟周期输入一个数据; s_axis_data_tvalid:输入数据有效标志位,该位为1时表示输入的数据有效,在AXI-Stream协议中,该位与前一级的相关的接口自动相连,自动判断是否有效,本例中直接向该引脚传入“1”,即输入数据一直有效; c.三个输出 s_axis_data_tready:指示是否准备好接收输入数据; m_axis_data_tdata[39:0]:滤波后的输出数据,40位位宽(实际上可以在IP配置时可以看到最后一页的总结里面箭头所指处表示输出数据的位宽为35位,但是此处是AXI-Stream接口,数据必须是8的整数倍,所以是40位,但是最高的几位没有实际含义)。 m_axis_data_tvalid:指示输出数据有效,有效输出时该位为1;
 (2)引出端口 右键单击选择 “Make External”,引出端口后点击箭头所指处,可以让软件检查是否有连线错误;
  (3)例化IP核 点击 1 处出现 2,右键单击 2 后先点击 3 生成 IP 核的硬件描述语言,完成 3 后再点击 4 调用 IP 核进行例化;
  (4)例化完成
,结合FIR滤波器搭建一个信号产生及滤波的系统,并编写testbench进行仿真分析。
转载地址:http://rkte.baihongyu.com/
你可能感兴趣的文章